Category: DIY

  • Shelves and More Shelves

    Last summer, we were finally able to remodel our kitchen. Truthfully, I had very little to do with it. My wife designed it all and we have a great contractor that’s upgraded most of our house.

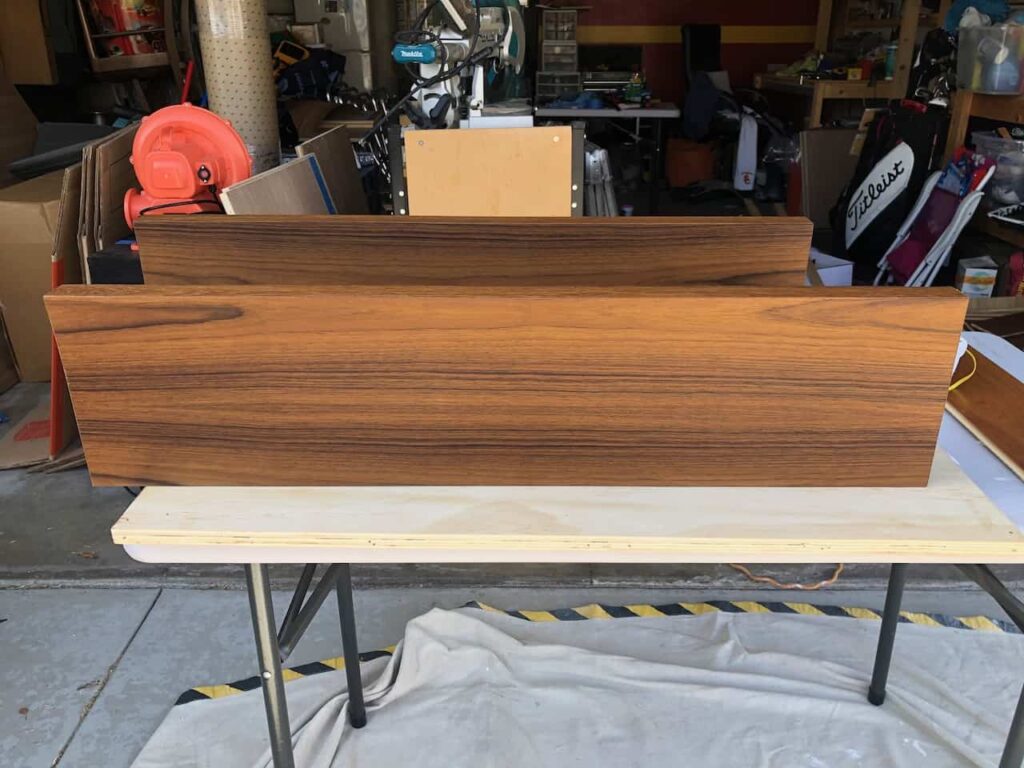
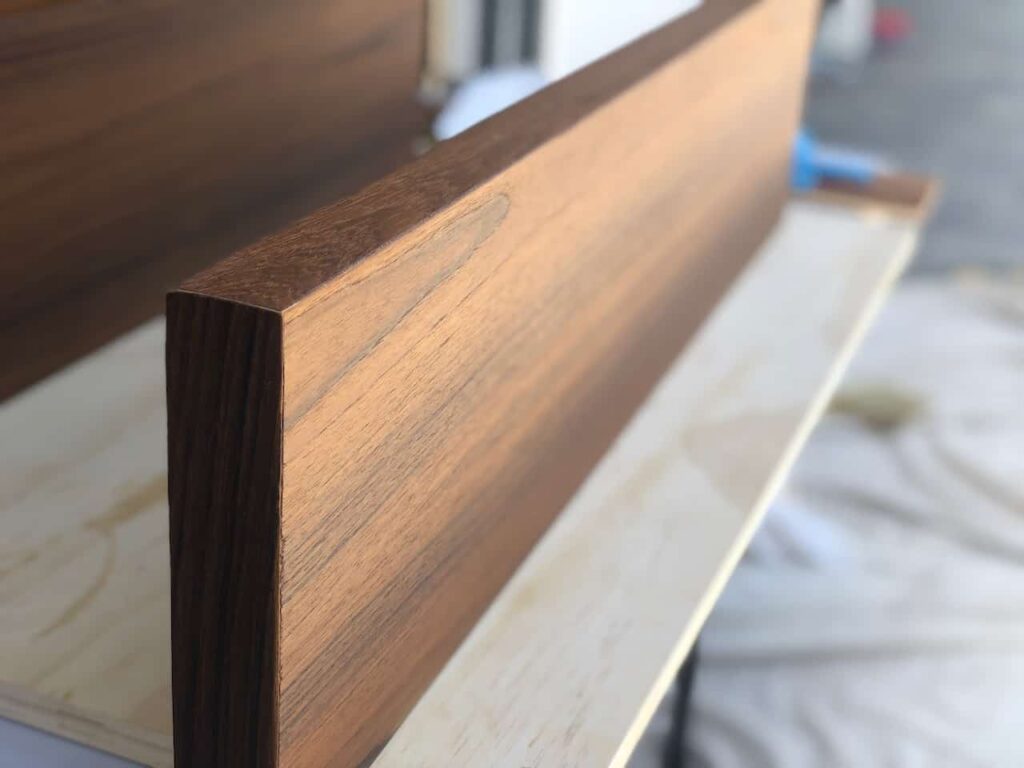
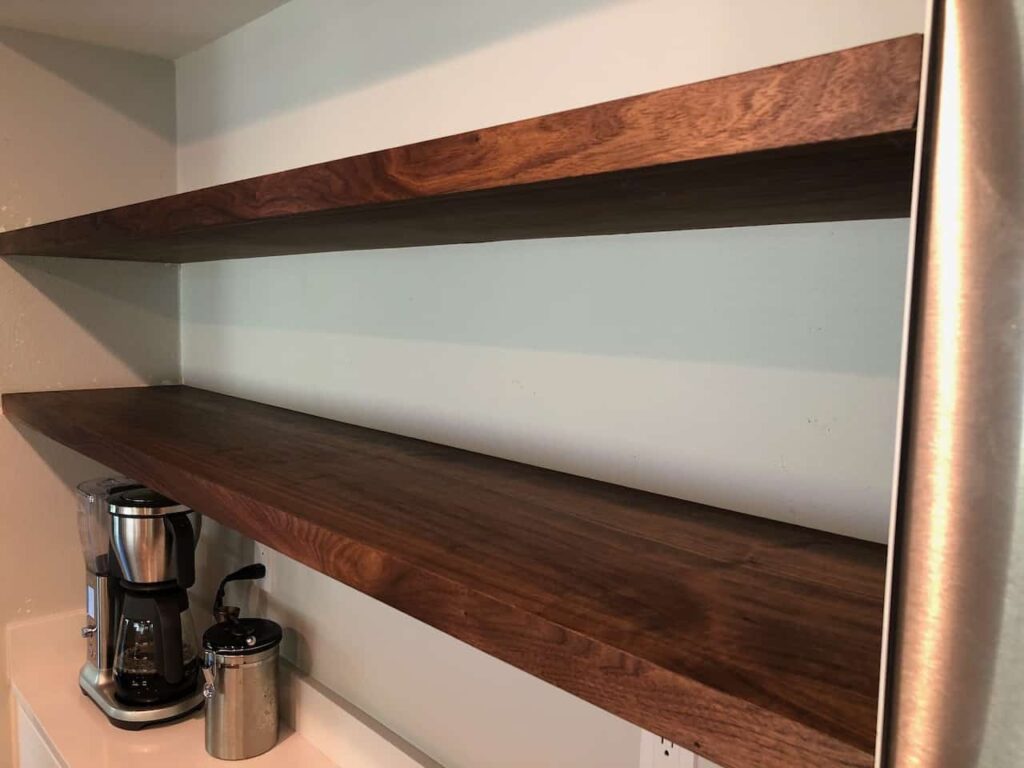
    But my job was to make some shelves. We want to have a couple of 6′ long floating shelves that could support a lot of weight. I looked into various ways on how to make them and ended up making a frame with a solid walnut front piece. Then I veneered some panels for the top and bottom. I wanted it to appear thicker (1 1/2″) but not too chunky either.

    I also made a cabinet on the other side of the fridge that’s also made of walnut and holds a microwave along with some other things. This turned out to be a nightmare for me, but it looks fine as long as you don’t look at it closely.

    I was trying to make it fit perfectly and that was my biggest problem. Walls are never straight and things are never perfectly level. I should’ve made it with normal dimensions and angles and used shims to straighten things out when mounting it. But I thought I’d try to match all the different angles perfectly.

    It would’ve worked out ok if I could’ve dry fit all of the pieces easily. But I had to assemble some of the parts to conceal the screw holes, and it just got too heavy to keep doing this. So I put together the pieces, hoping I had everything right. And of course, I didn’t.

    I made the sides angled to match a crooked wall, so that it would appear straight. The problem was that I assembled them on the wrong sides and I think upside down. So the end result is the angles went the wrong way. I couldn’t really take it apart because I veneered over the screws, so I had to use a ton of big shims to straighten it out. Nobody even looks behind counters, but if you do, there is a huge gap and a wood block to straighten it out. So, it wasn’t my best work and there’s no picture for this one, even if the main problem isn’t visible.

  • More Shelves

    I was working on these floating shelves for our 1/2 bath while I was working on the kitchen shelves. We had some store bought, white, floating shelves that we were using in the kitchen before we remodeled that happened to fit in the bathroom.

    We didn’t want to go with white for these ones, so I bought some teak veneer for the tops and bottoms and used a solid teak board for the face like I did for the kitchen shelves.

    But in this case, the teak veneer was so good that you can’t even tell that the face is any different. I guess that’s a good thing, but I didn’t have to use the more expensive teak board.

    Of course, these walls are really crooked and there were some huge gaps on both sides even though the back corners were a perfect fit. So to fix it, I glued some shims on the edges so that it fills up the space and left the veneer a little longer to cut it in place when it was installed.

    So, now it’s a place for my wife to display some knickknacks and toilet paper, which I removed for this picture.

  • Retro Console

    I can’t recall when I made this, but a few years ago I built a small retro console.


    I assembled a Raspberry Pi and loaded the RetroPie image that has a bunch of emulators for old game systems like the Super Nintendo.  It’s pretty amazing that you can build a fully working computer the size of a deck of cards for around $50, that’s also way more powerful than those old arcade game systems of my youth.

    You can run this with a modern monitor, but I decided to go the full retro route.  I found and actually paid a guy a few dollars for a small CRT TV and built a cabinet around it.

    This project was really for me to learn how to use a router (woodworking) and do some more veneer work.  So I built a basic box, then used the router to cut the rounded corners.  Then I applied the walnut veneer, but made some mistakes that I haven’t gone back to fix. 

    I wanted to make a bezel, but I didn’t really figure out how to do this with the curves of an old CRT.  So, I just cut some wood strips with a chamfer bit to give it a small edge with an angled face and applied some adhesive foil to it.  It didn’t come out all that great, but I was ok with it.

    I bought the legs since they were too much for me to make, and I used some basic drawer pulls for the faux knobs. And used some speaker cloth to conceal a bluetooth speaker mounted inside the cabinet.

    Once I had this all put together, the only thing left to do was to play some old games from my childhood. I had so many fond memories playing games like Excite Bike, Punch Out, Zelda, and of course all of the Mario games. Then there were the action games, like Contra, with the cheat code that everyone still remembers 30 years later. And the sports games like the first Maddens and the NHL game that I loved, even though I’ve never been into hockey. And lastly, the original RPGs like Final Fantasy that I wasn’t into until later.

    So I sat down to play these and played them for … about 5 minutes. Most of the time, I could over-look the graphics, then sometimes the gameplay. Some of them are actually real hard and the RPGs don’t lead you down a path or give you any hints if you forgot what you were supposed to do. It was then that I realized that so much of the appeal was purely just the nostalgia factor.

    I’ve never really played it much, but I did end up playing through Final Fantasy and part of Chrono Trigger. I think the old RPGs are the most enjoyable because they’re more about the story and there’s something cute about the 8-bit graphics and midi music. But I would inevitably save the game and forget what I was supposed to do by the next time I turned it on, and then lost patience.

    But every now and then, my kids still ask to play the bubble game (Bust-a-Move) or the Ninja Turtles on the old TV and that makes me happy.

  • Figured Teak Desk

    So, my wife wanted me to make her a desk, so we made a trip up to our usual wood store. She found this figured teak board that she really liked. Most people really like figured wood, but I’m not normally a huge fan of it. I tend to like quarter sawn, long straight grains but this board was pretty amazing.

    I’m always nervous to cut nice, expensive wood but luckily I didn’t have to make many cuts. And the grain lined up relatively well. So I just drilled some holes for some dowels and glued it up.

    After a lot of sanding, I had to choose which teak oil to use – Starbrite or Watco. Anyone who’s ever used Watco can recognize it by the awful cap and the accompanying wrench that’s need to pry it open.

    I tried both on some of the scrap pieces and… I couldn’t really tell the difference. I thought the Starbright was a little less orange and I couldn’t find my wrench, so I went with that one. And it sure made the grain come to life.

    It’s hard to describe, but it looks almost like the grain is under a layer of glass. And all of the textures look almost 3D and reflect the light.

    All that was left to do was to attach some hairpin legs my wife bought on Etsy and her custom desk was complete.

  • Refinishing a Teak Outdoor Set

    My wife’s former co-worker had some family that lived nearby and wanted to get rid of some older outdoor furniture. It was made of teak, so we both knew it would look great when it it was refinished, but they were ready for something else.

    So we got it home and I sanded it down. I can’t remember what teak oil I used but it was probably the Watco one since I used the Starbrite on my wife’s desk – and I found my wrench.

    I sanded and tested a small section and it looked great, so I kept going.

    It was all cleaned up but it looked pretty plain. So I wiped on some teak oil and it looked much better.

    We weren’t found of the chairs, but we took them apart and my wife is working on a project with the reclaimed wood. They also gave us a lounge chair seen in the background, but I haven’t gotten around to working on this and just end up sitting on it. Maybe next summer.

  • Refinishing Practice

    There’s a TJ Maxx around the corner from my house, which is probably where I buy most of clothes while waiting for for my wife to shop. So, after I browse through the clothes and take the kids to check out the toys, the only thing left for me to do is to look at the furniture.

    Usually, it’s junk but every now and then, they have some things that are actually made of wood and is usually acacia.

    One day, I came across this stool. I forgot to take before pictures, but it really looked nothing like this. It was very blocky and looked unfinished, like someone took a machete and chopped out a basic shape and left it as that. And there were lots of white streaks of sap wood and it the wood was an unusual color too.

    But, I liked the basic shape of it and I recently worked with wood dyes, so I thought I’d be able to even out the sap wood. I picked it up and proceed to wait for my wife to checkout.

    Sometime much later, we were home and I sanded this thing for hours. I think I found out what kind of wood it was in between sanding breaks, but I have no idea what that was now. It was pretty soft so I kept going until it was smooth.

    Then I applied a bunch of different wood dyes more than a few times to darken the sap wood but it was taking. Once this was dried, I applied some gel stains and later finished it with Arm-R-Seal, which is a light weight polyurethane that’s not too thick or shiny. And I think I finished it off with some paste wax, but I really don’t remember.

    I think it turned out pretty good and it looks like a much more expensive piece that it is. But more importantly, my wife likes it now and I got a little better with wood dyes and refinishing.

  • Workspace – In Progress

    I always wanted to have one of those cool workspaces you see in the stock photos (like the one on my site).  But if I’m on my laptop, I’m usually downstairs and slouching on my sofa, in front on a TV…  But I still wanted to try to make a decent workspace in the guest room so maybe someone will use it.

    I went to my favorite wood shop, Austin Hardwoods, in Santa Ana.  I looked through a bunch of black walnut, teak and other woods.  I was thinking of how I’d have to glue some boards together without owning a jointer or planner or even knowing how to use either tool.  I was a little discouraged, but on my way out, I found this board.

    It’s Burmese Padauk – at least that’s what the sticker says.  I’ve never heard of it before so I Googled it and liked what I saw.  This piece was pretty expensive and I’m not sure how it looks to most people, but I envisioned it looking great.  There was something that told me to buy it, so I listened – something I’ve been trying to do more of too.

    I used a hand planner that caused more problems.  I’m not very skilled with these and it took out some big chunks of wood here and there.  So, I sanded it a lot.  I think something like 100/120/180/220/400 grit sandpaper.

    I decided to try this Sam Maloof finish.  People say you can make the same thing for less using a 1/3 of this, a 1/3 of that and 1/3 of something else I forgot.  It’s a little pricy too, but this quickly became my favorite finish I’ve used.  It gave the wood a nice color, brought out the grain, and provided a layer of protection that’s very flat.

    I also rubbed it down with Renaissance wax that has great reviews on Amazon.  I haven’t been blown away by this stuff, but I haven’t used it on much else either.

    I’m very pleased with how it turned out though:

    And the workspace pics are never complete without a Mac:

  • Workspace – Speakers

    My last post was about the desk I made (really more of finishing than making).  Underneath the desk are some speakers I’ve been refinishing too.  That’s taken me over two years, but they’re finally complete.

    My wife and I like to go to thrift stores to look for things we can fix up.  I found these KLH 17 speakers a few years ago and bought them for $20.  They were in pretty rough shape and one of the tweeters was blown.

    I ended up on forums, which seem to be the best source of information on the internet.  I bought a replacement tweeter on eBay as well as a sealant to repair the seal around the woofer.  I also read that the capacitors (or something) was likely to be broken so I ordered some parts and followed a step-by-step guide to replace the crossovers (thanks again, internet).

    They sat like this for over year until I started working on the desk.  I ended up refinishing the cabinets at the same time and it was much faster this way.

    I’ve also bought some speaker fabric on Etsy before, but I found the same material for much cheaper somewhere else that I forgot too.

    I’ve also been experimenting with some mini-amps on Amazon.  I used a Lepai on another project, I tried a Topping TP22, but I settled on an SMSL SA50 because it has more power and sounds great with these speakers.

    I’ll have to make some stands to get them off the ground next.  I have plans to use some of the scrap Ipe wood I used to build our fences but this will probably take me another year to get to.


  • Another Planter Box

    I made this planter box years ago but I never used it until last year.  I found this great Bonsai tree at Upland Nursery in Orange and it fit pretty well in here.

    I made this back when I made this dog house.  I didn’t own a saw at the time, so I made sure to cut this wood while I was borrowing my brother-in-law’s saw.

    It’s cheap redwood from Home Depot and I think it’s golden yellow stain.  Had I made it recently, I probably would’ve tried to dye the wood with some red and then apply the stain to give it more depth.

  • Front Yard

    We picked our yard as our big project for the year. And by we, I mean my wife.  I wanted to work on other things inside the house, but I started digging up the side yard and that lead to this.  Ironically, the first patch that I dug up is the one patch that I haven’t done anything with yet.

    This is our new front yard after removing the old sod, digging out two huge tree roots, numerous over-grown plants, removing the old sprinkler system, installing a new one, adding low-voltage wiring and lighting, a french drain, pavers, new gutters around the house, a rain chain, new power outlets and a security camera. Along with all of the new stuff – Ipe wood fence, Mexican beach pebbles, mondo grass, two more Japanese maples, decorative ground cover and decomposed granite.

    It really was the biggest project we’ve done and I did a lot of it by myself.  And we’re still not done because the red pavers are placeholders for some large stones.  But we’ve received lot of compliments, it’s very low maintenance and we don’t use much water so it was all worth it.

    Front Yard

    When we first moved in, we hired someone to cut down three trees in the back.  Although, there were two huge maple trees in the front yard that were cut down but the roots weren’t removed.  We had some really lumpy grass that was hiding it all.

    We also hired a crew of 4 guys that worked on removing the tree stumps and roots.  They also tilled and leveled the yard, but they somehow missed this one.  This took me a long time to dig out, but I kept at it and did it piece by piece. Tree stump

    Once the roots were gone, I dug the fence post holes for our fence.  We live in an area that was once part of the ocean, so once you dig 6 inches down, you get to this rock hard sand.  Digging the post holes was such a a pain, but not nearly as hard as removing the stump.

    Front Gate

    This is the fence I made from Ipe wood that I ordered through AdvantageLumber.com.  I haven’t ordered that much wood before so I can’t compare it to anything.  I’d say that the 8′ boards were mostly great but there were a handful that I didn’t want to use.  Although, what I thought were some of the ugliest boards actually came out as the best ones when I applied the Mesmer’s oil.  And the 8′ boards were pretty straight but the 12′ boards I used for the side yard fence were pretty warped.  So overall, I was happy with the wood, but it could’ve been a little better too.